Keto-Paleo Fermentation: Easy Gut-Healthy Starters
If you’ve been following a keto or paleo lifestyle for any length of time, you’ve probably heard about the gut-health benefits of fermented foods. But here’s the thing — keto-paleo fermentation is so much simpler than it sounds. We’re not talking about complicated lab setups or specialty equipment. We’re talking about a jar, some salt, a little patience, and vegetables you already know and love. Let’s make something delicious together.
Why Keto-Paleo Fermentation Deserves a Spot in Your Kitchen
Fermented foods have been part of human diets for thousands of years. Long before probiotics came in capsule form, our ancestors were preserving vegetables in brine and culturing dairy alternatives by instinct.
For those of us eating keto or paleo, fermentation is genuinely exciting. Most fermented vegetables are naturally low in carbohydrates. The fermentation process actually consumes some of the sugars present, making the final product even more keto-friendly than the raw ingredient.
Beyond macros, fermented foods introduce beneficial bacteria into your digestive system. A healthy gut microbiome supports everything from nutrient absorption to mood regulation. If you’ve been building your meals around our fiber-focused keto-paleo approach, adding ferments is the natural next step for supporting digestive health.
Plus — and this part matters — they taste incredible. Tangy, complex, alive. A spoonful of good sauerkraut can transform a simple plate into something memorable.
Understanding the Basics Before You Begin
Fermentation sounds scientific, but the principle is beautifully simple. You’re creating an environment where beneficial bacteria thrive and harmful bacteria can’t survive.
Salt is your best friend here. It draws moisture out of vegetables, creates a brine, and establishes the right conditions for lacto-fermentation. The beneficial bacteria already present on fresh vegetables do the rest of the work naturally.
There are just a few things to keep in mind as you start:
- Use clean equipment. Wash your jars thoroughly. No need to sterilize, but clean matters.
- Keep vegetables submerged. Anything above the brine can mold. Use a small zip-lock bag filled with brine as a weight if needed.
- Use non-iodized salt. Iodized salt can inhibit fermentation. Sea salt or kosher salt work perfectly.
- Be patient. Fermentation takes days, not minutes. The wait is always worth it.
This is the same spirit of working with your ingredients rather than against them — something we love about the market-first keto-paleo approach to building meals around what’s fresh and available.
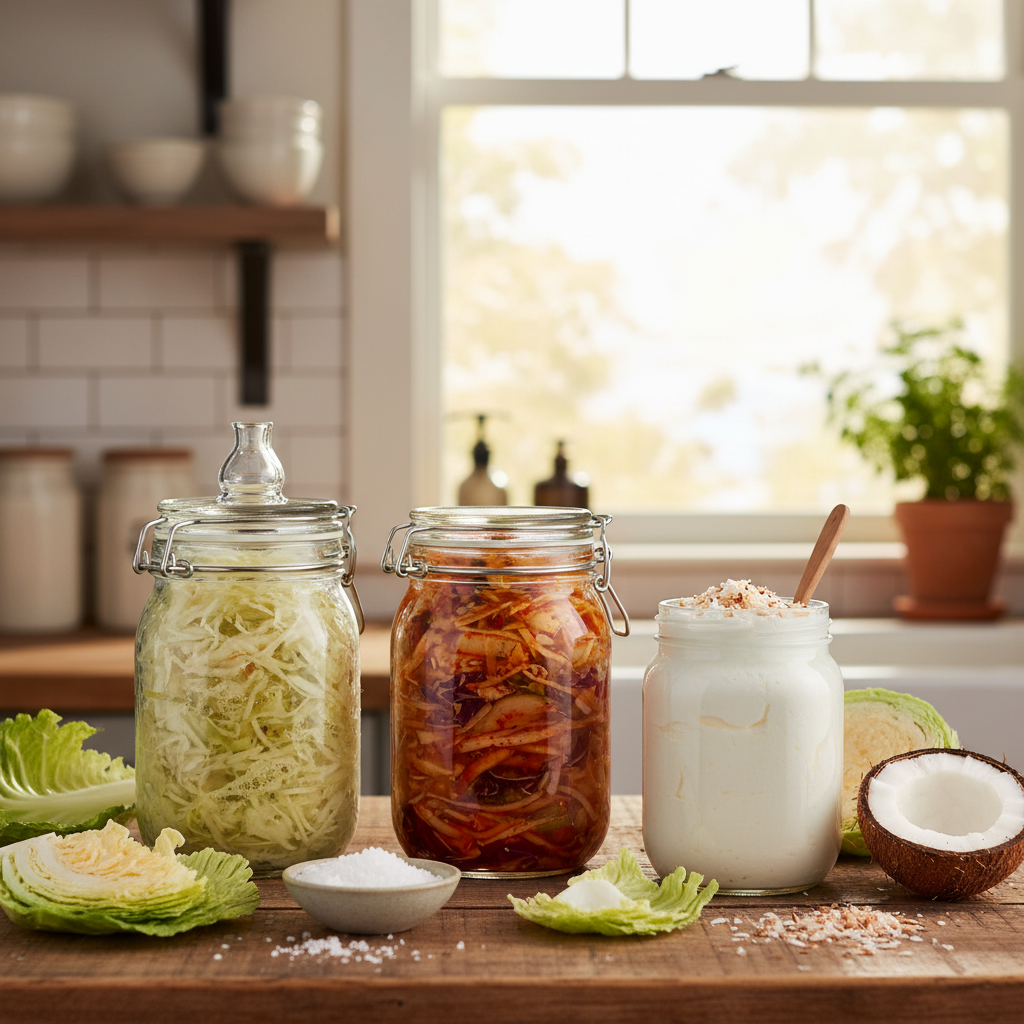
Recipe 1: Classic Keto-Friendly Sauerkraut
Sauerkraut is the perfect starting point for your keto-paleo fermentation journey. It requires exactly two ingredients — cabbage and salt — and delivers deeply satisfying, tangy results every time.
What You’ll Need
- 1 medium head of green cabbage (about 2 lbs)
- 1 tablespoon non-iodized sea salt
- 1 wide-mouth quart mason jar
How to Make It
Start by removing the outer leaves of the cabbage and setting one aside. Shred the cabbage thinly — a sharp knife or mandoline works well. Add it to a large mixing bowl.
Sprinkle the salt over the shredded cabbage. Now comes the satisfying part: massage and squeeze the cabbage firmly for about 8–10 minutes. You’ll feel it soften and release liquid. That liquid is your brine.
Pack the cabbage tightly into your mason jar, pressing down firmly after each handful. The brine should rise up over the cabbage. If it doesn’t quite cover after 10 minutes of settling, dissolve 1 teaspoon of salt in half a cup of water and add just enough to submerge everything.
Tuck the reserved cabbage leaf over the top as a cover, then weigh it down. Cover the jar loosely — a cloth secured with a rubber band works well — to let gases escape.
Leave it on your counter, away from direct sunlight, at room temperature. Taste it starting at day 3. It’ll be mild and crunchy. By day 7–10, it’ll have developed that signature tang. Transfer to the fridge once it tastes right to you.
One jar of sauerkraut can last weeks in the refrigerator. Serve it alongside eggs, grilled meats, or tucked into a lettuce wrap for a probiotic boost at any meal.
Recipe 2: Quick Keto Kimchi (No Fish Sauce Needed)
Traditional kimchi uses fish sauce and sometimes a small amount of sugar. Our version keeps it completely paleo and keto-compliant while delivering that punchy, spicy flavor you’re after.
What You’ll Need
- 1 small head napa cabbage, chopped
- 1 tablespoon sea salt
- 3 cloves garlic, minced
- 1 teaspoon fresh ginger, grated
- 2 tablespoons Korean red pepper flakes (gochugaru)
- 3 green onions, sliced
- 1 teaspoon coconut aminos
Salt the cabbage and let it sit for one hour, then rinse and squeeze out excess liquid. Mix together the garlic, ginger, gochugaru, coconut aminos, and green onions to form a paste. Toss the cabbage thoroughly in the paste, pack into a jar, and press down until the brine rises. Ferment at room temperature for 1–3 days, then refrigerate. The flavors deepen beautifully over the first week.
This kimchi is wonderful alongside our deeper exploration of ferments and flavor combinations — seriously, that post will give you even more inspiration for building complex, gut-friendly meals.
Recipe 3: Cultured Coconut Yogurt
This is where keto-paleo fermentation gets really exciting. Coconut yogurt gives you all the creamy, tangy satisfaction of dairy yogurt without the lactose. It’s thick, probiotic-rich, and endlessly versatile.
What You’ll Need
- 2 cans full-fat coconut cream (refrigerated overnight)
- 2–3 probiotic capsules (open and use the powder inside)
- 1 teaspoon raw honey (optional — feeds the culture; most sugar is consumed during fermentation)
How to Make It
Scoop the thick cream from the top of the chilled coconut cans into a clean glass bowl or jar. Discard or save the watery liquid for smoothies. Whisk the coconut cream until smooth.
Open your probiotic capsules and sprinkle the powder in. Add the honey if using. Stir gently but thoroughly. Cover with a breathable cloth and set in a warm spot — around 75–80°F is ideal. An oven with just the light on works perfectly.
After 24–36 hours, your yogurt should smell pleasantly tangy and taste slightly sour. Stir, cover tightly, and refrigerate for at least 4 hours to thicken further.
Serve it with berries, a drizzle of almond butter, or use it as a creamy base in sauces and dressings. It keeps well in the fridge for up to one week.
Building Fermentation Into Your Weekly Routine
The best part about keto-paleo fermentation is how naturally it fits into a batch-prep mindset. Start a jar of sauerkraut on Sunday, and by midweek you have a ready-made condiment for five different meals.
If you’re already doing some form of weekly meal prep — and if you’ve explored our athlete-approved batch cooking strategies — fermentation is the low-effort, high-reward habit that slots right in beside your usual routine.
You don’t have to do all three recipes at once. Start with sauerkraut. Get comfortable with the process. Then try the kimchi. Then graduate to coconut yogurt when you’re ready. There’s no rush, and each small batch teaches you something new.
Troubleshooting Your Ferments
Sometimes fermentation throws you a curveball. Here’s what to do when it does:
- White film on top: This is usually kahm yeast — harmless but unpleasant-tasting. Skim it off and make sure your vegetables stay submerged going forward.
- Fuzzy colored mold: Pink, black, or green fuzzy growth means it’s time to discard and start fresh. This is rare if vegetables stay submerged.
- Not tangy enough: Give it more time. Cooler kitchens ferment more slowly. Taste daily until it reaches your preferred flavor.
- Too salty: Rinse before serving. Next batch, reduce your salt slightly.
Trust your senses. Fermented food that has gone wrong smells genuinely unpleasant — not just sour, but rotten. Good ferments smell tangy and appetizing. You’ll know the difference immediately.
Your Gut Will Feel the Difference
Once you start incorporating homemade fermented foods regularly, many people notice real changes in digestion, energy, and even how well other healthy foods feel in their bodies. It’s one of those foundational habits that quietly upgrades everything around it.
Keto-paleo fermentation isn’t a trend. It’s a return to something ancient and deeply nourishing — and it happens to fit beautifully into the way we eat today. Start with a single jar. See what happens. I promise you’ll be hooked by the time that first batch hits the fridge.
Ready to keep exploring? Check out our one-week keto-paleo energy reset for a full week of meals that pair wonderfully with your new fermented staples.